
Tuesday, December 21, 2010

Thursday, November 25, 2010
USB device not recognized
Are you getting a “USB device not recognized” error whenever you plug in a USB mouse, keyboard, or other USB device? I love USB and have 5 ports on my computer so that I can connect my mouse, keyboard, camera, phone, and printer to it all at once!
So I started with the normal fixing methods, including uninstalling the drivers for my devices and reinstalling them. That didn’t work! Next I tried System Restore thinking that maybe I had installed something and it caused a conflict with the USB system drivers. That didn’t work!
However, last weekend, my computer stopped recognizing my USB devices! The strange thing about it was that the USB ports were not bad because all of my devices were still getting power to them. I could still charge my cell phone without a problem!
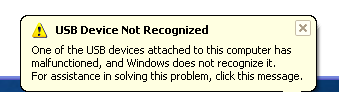
So I started with the normal fixing methods, including uninstalling the drivers for my devices and reinstalling them. That didn’t work! Next I tried System Restore thinking that maybe I had installed something and it caused a conflict with the USB system drivers. That didn’t work!
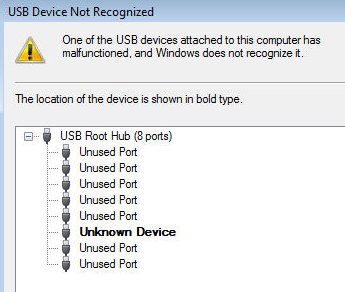
You may also see in Device Manager that the device shows up as an “Unknown Device”.
So how did I finally fix the problem? Well, apparently it’s a super simple solution! No need to edit the registry, uninstall drivers, or anything of that sort.
Simply UNPLUG YOUR COMPUTER FROM THE POWER SUPPLY. Yes that’s it! Note that this does not mean just turning off your computer because modern computers don’t really turn off when you press the power button as the motherboard still gets power.
First to explain, the motherboard is where all of hardware of the computer is connected to, including the USB ports. Sometimes the motherboard needs to be “rebooted” also because something can go wrong, i.e. all your USB ports suddenly stop working. The small microprocessor on the motherboard will reload the drivers and your USB ports should be back to recognizing all devices!
So first turn off your computer using Shut Down or pressing the power button and then UNPLUG it from the wall outlet. Let it sit for about a minute and then plug it back in.

Hope this helps someone fix that pesky “USB device not recognized” Windows error!
Saturday, November 20, 2010
How to remove autorun.inf virus
There is a much simple way to remove the Autorun.inf file. Genreally when you refresh the windows explorer view a bounded virus process recreates this file. This file is attached to many events of windows explorer including OPEN, REFRESH, etc. Simple stept to remove the virus activation: You must close opened explorer windows. 1. open up a command prompt (i.e. cmd.exe) >> to load it go to Run, type cmd, enter. 2. Now to remove virus's attributes (in order to delete it type following line by line and execute them pressing enter. e.g. F:\ F:\attrib -s -r -h *.* If there are any malicious EXE files those are now visible so if unnecessary delete them too. F:\del autorun.inf 3. After finishing above, quickly remove the pen as soon as posible (just after executing del command). 4. Now your pen is without virus activation config. file. Now you can safely delete unnecessary EXE files on it.
Friday, September 3, 2010
DOS / Windows IP Commands
Below, you'll find a list of the most common IP commands for Windows and DOS. These include ipconfig, trace route, netstat, arp, route, hostname, control netconnections, and other popular DOS and Windows IP commands.
Display Connection Configuration: ipconfig /all
Display DNS Cache Info: ipconfig /displaydns
Clear DNS Cache: ipconfig /flushdns
Release All IP Address Connections: ipconfig /release
Renew All IP Address Connections: ipconfig /renew
Re-Register the DNS connections: ipconfig /registerdns
Change/Modify DHCP Class ID: ipconfig /setclassid
Network Connections: control netconnections
Network Setup Wizard: netsetup.cpl
Test Connectivity: ping whatismyip.com
Trace Route: tracert
Displays the TCP/IP protocol sessions: netstat
Display Local Route: route
Display Resolved MAC Addresses: arp
Display Name of Computer Currently on: hostname
Display DHCP Class Information: ipconfig /showclassid
NameServer Lookup: nslookup whatismyip.com
Display Connection Configuration: ipconfig /all
Display DNS Cache Info: ipconfig /displaydns
Clear DNS Cache: ipconfig /flushdns
Release All IP Address Connections: ipconfig /release
Renew All IP Address Connections: ipconfig /renew
Re-Register the DNS connections: ipconfig /registerdns
Change/Modify DHCP Class ID: ipconfig /setclassid
Network Connections: control netconnections
Network Setup Wizard: netsetup.cpl
Test Connectivity: ping whatismyip.com
Trace Route: tracert
Displays the TCP/IP protocol sessions: netstat
Display Local Route: route
Display Resolved MAC Addresses: arp
Display Name of Computer Currently on: hostname
Display DHCP Class Information: ipconfig /showclassid
NameServer Lookup: nslookup whatismyip.com
Wednesday, September 1, 2010
Rename Recycle Bin or Change Recycle Bin Name
Recycle Bin is the place that all your deleted files and folders goes after you delete them from the original purpose. To safeguard the files or folders just in case you accidentally remove them, the files and folders are not been cleaned and swiped off completely, instead been moved to recycle bin, so that they can be recovered when needed. However, what if you don’t like the name of recycle bin, and prefer name such as rubbish bin, garbage bin, unwanted file place, useless file corner and etc?To change the name of recycle bin or rename recycle bin in Windows XP, Windows 2000, Window NT
, Windows Me, Windows 98 or Windows 95, just edit a registry value:
Open registry editor by going to Start -> Run, and execute regedit.
Navigate to the following registry branch:
HKEY_CLASSES_ROOT\CLSID\{645FF040-5081-101B-9F08-00AA002F954E}\
On the right pane, locate the registry key of LocalizedString.
Double click on LocalizedString or right click on LocalizedString and select Modify to modify the registry value.
You should see the default value of “@%SystemRoot%\system32\SHELL32.dll,-8964″. Delete or remove the default value and key in your desired new recycle bin’s name in text, e.g. “Garbage Bin” (without quote).
Refresh your desktop or Windows Explorer by pressing F5. You will see the new ‘recycle bin’ name.
Optionally, you can also modify the text of InfoTip, commonly known as tooltip what display certain help tip, guide or description about Recycle Bin when the mouse is hovering on Recycle Bin icon on desktop. The default text is “Contains files and folders that you have deleted.” Simply double click on InfoTip, or right click on InfoTip and select Modify to change the text of the info tip.
The default value is “@%SystemRoot%\system32\SHELL32.dll,-22915″ simply change it to another description that you want the tooltip to be.
Refresh the desktop to make it effective.
Another alternative is to show the Rename option on the right click contextual menu that is displayed when right click on Recycle Bin icon or folder.
Subscribe to:
Posts (Atom)